
![]()
ELBOW PAIN TREATMENT 2/2
WRISTS STRETCHING/STRENTGHENING ROUTINE
Some of the following exercises might have been already included into a previous article of our; the reason is that, no exercise should be excluded when talking about wrist/forearm stretching and strengthening since in any case you are going to do a whole work aiming to prevent and eventually avoid elbow pain in your journey.
For these reasons some of these exercises will be repeated here, but included in a different and more exhaustive routine which targets indeed not only wrists, but indirectly also forearms and elbows.
The routine can be included before your workouts as well as in a separate session if you aim to perform it together with all the other exercises/methods showed above.
For this reason the number of sets, reps and seconds that are gonna be showed are referring to the second case, if you perform each exercise prior to a workout, just do it for one set each type.
No matter the choice, I suggest you following the routine in the order showed below to get the best results.
WRISTS PALM DOWN
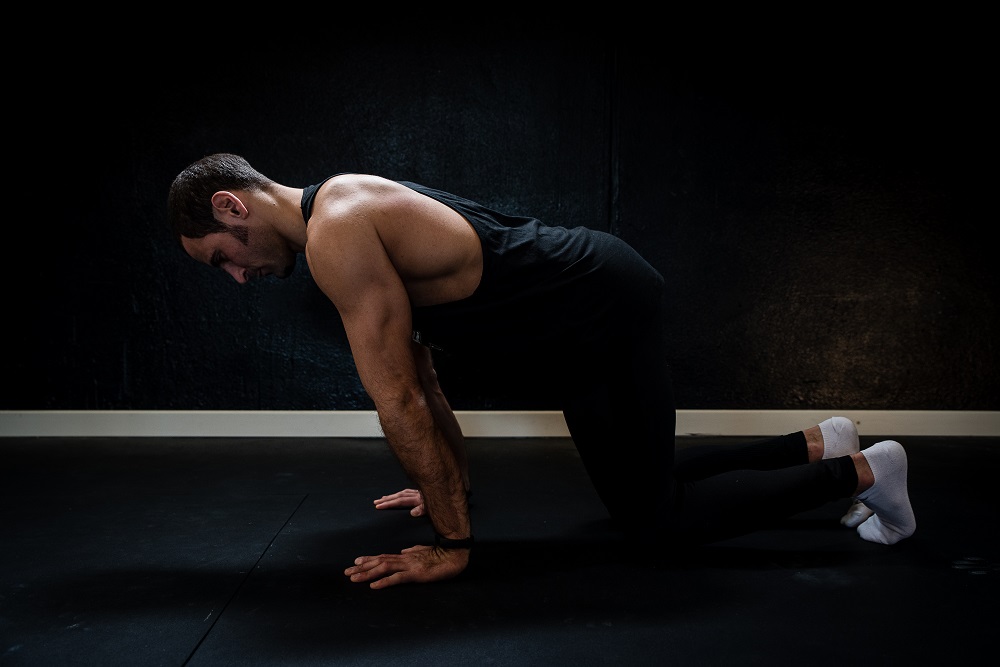
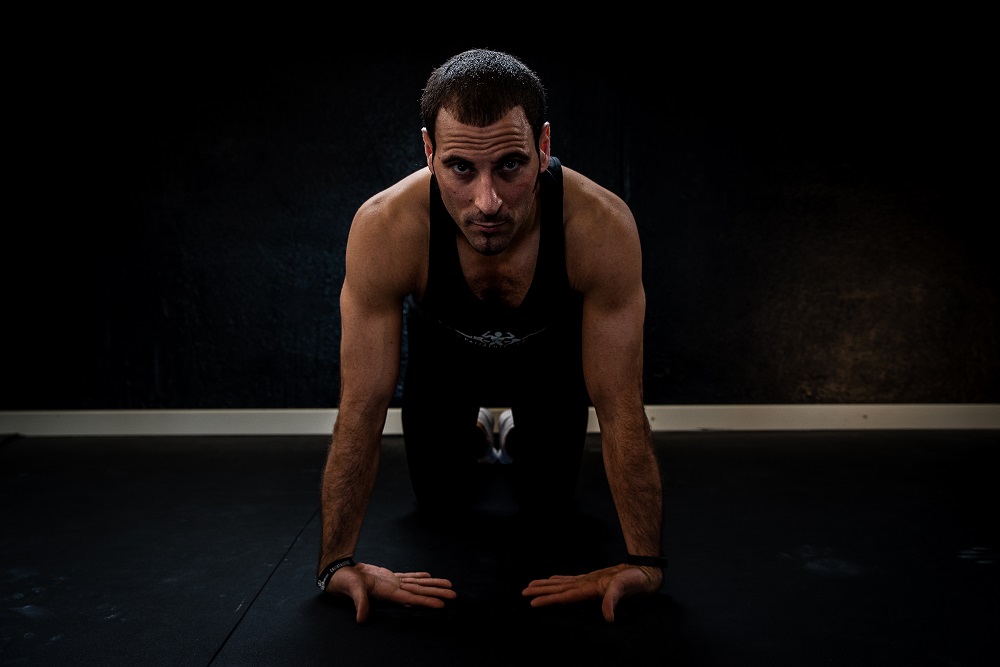
- FORWARD LEAN STRETCH + HOLD (VARIANT 1): start by kneeling on the floor in a quadruped stance with hands shoulder-width apart, arms straight and fingers wide opened pointing forward.
From this stance, you wanna make sure to lean forward until a point where you feel a little tension in your wrists, but it doesn’t have to hurt.
Very important detail to pay attention to, the fact to hold the palm of your hands always attached to the floor so to target specifically the stretch to the wrists.
After leaning forward come all the way back with the help of your body that, due to the dynamic nature of this exercise, will guide you back and forth at every repetition.
I also suggest holding for at least 10 seconds the last repetition in each set so to combine the dynamic with the static.
3 sets x 5-10 reps + 10” hold every last rep
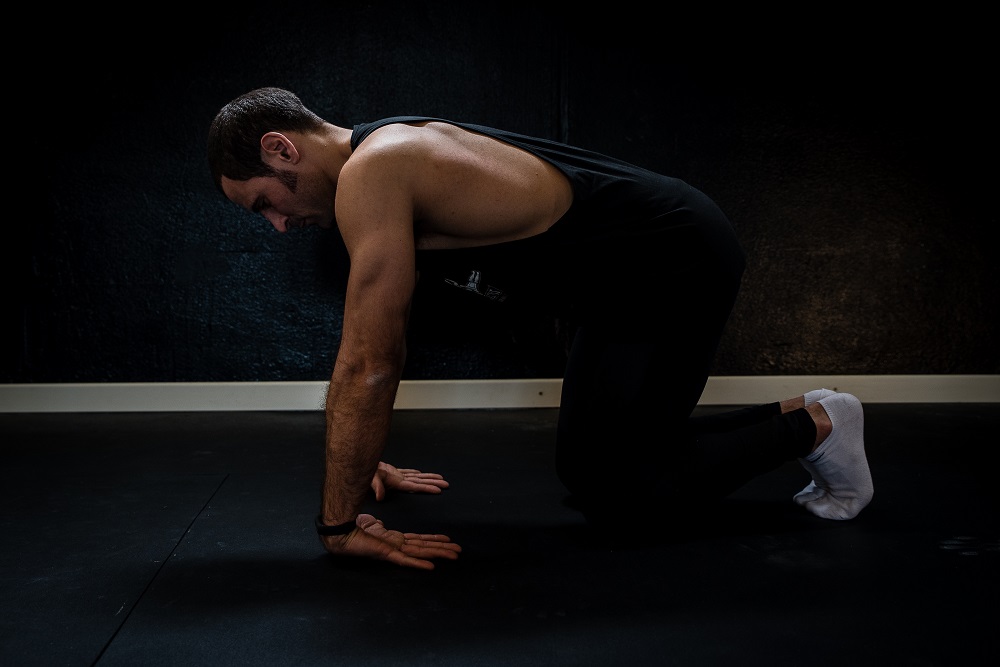
- FORWARD LEAN STRETCH + ELBOW TWISTS + HOLD (VARIANT 2): a more interesting variation of the previous exercise can be achieved by including one more dynamic in the whole movement.
This means that, whenever you lean back and forth, you might think of trying including also a little rotation of the elbow that alternatively will tuck in (lean forward) and out (lean back).
Definitely a nice technique to adopt in order to contemporary work on wrist/forearm strength and flexibility as well as elbow mobility.
As for the previous variant, hold every last rep for at least 10”.
3 sets x 5-10 reps+ 10” hold every last rep
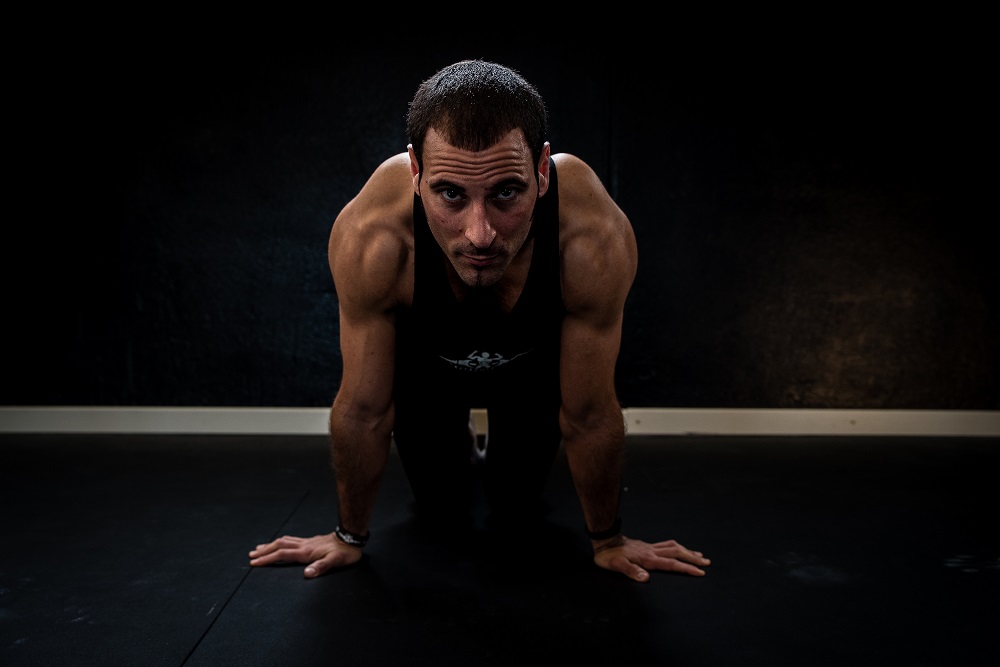
- ELBOW TWISTS (KNEELING OR PUSH-UP STANCE): the purpose of this exercise is to focus exclusively on the dynamic movement of the wrists in a little different way than above.
It means that, starting always from a kneeling stance with palm down and arms straight, you wanna make sure to hold a line between your shoulders and wrists and from there, start performing elbow twists by isolating the movement.
This means that, for repetitions, the elbow will tuck in and out alternatively, but of course, in this case you don’t have to lean.
At the very beginning, in order not to stress too much the wrists, you can start by performing twists from a kneeling stance with one wrist at a time while the other hand provides support on the floor.
3 sets x 5 reps minimum (each wrist)
If the previous form is too light and easy to perform, move on to the more difficult one, hence with both wrists contemporary from a push-up stance.
3 sets x 10 reps minimum
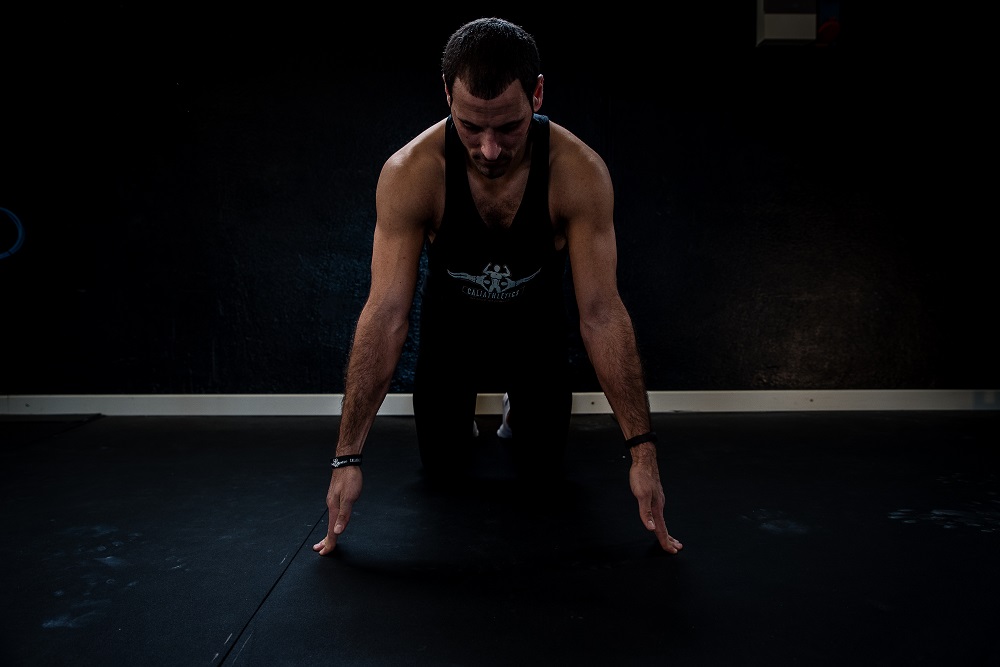
- CIRCLES CLOCKWISE/COUNTERCLOCKWISE: in this variant of the palm down sequence, you wanna focus on performing a circular motion clockwise and counterclockwise while holding the palm of your hands firmly on the floor while maintaining the arms straight.
3 sets x 10 reps (5 clockwise + 5 counterclockwise)
- HANDS’ PALM LIFTS – BEGINNER-INTERMEDIATE/ADVANCED: the purpose of this exercise is to strengthen the wrists through a natural and yet effective movement by using your own bodyweight to regulate its intensity.
What I mean is that, starting always from a quadruped position with hands shoulder-width apart and palms of the hands on the floor, you have to aim to elevate them for repetitions so to focus on strengthen indeed the joint.
As said above, you can choose the intensity of this exercise thanks to the stance you get before starting:
BEGINNER/INTERMEDIATE: this means that, if you start in a quadruped stance and so with knees fairly far from your hands, when you are going to elevate the palm of your hands from the floor for repetitions you have surely more control of the movement in both senses, all the way up and down.
Here we can say that you use part of your entire bodyweight since you are not gonna charge much your wrists
ADVANCED: different is, if you get instead an advanced stance starting from a push-up position where you direct most of the entire bodyweight on your wrists, making the exercise more intense, but also more difficult to execute.
In this case, you have to pay attention to elevate your palms while fingers are always firmly on the floor in a controlled way so to come all the way back without stressing much your wrists due to the load they’re bearing in this phase
3 sets x 10 reps (whichever stance you choose)
- FINGERTIPS LIFTS: opposite to the previous exercise, where fingers have to be all time adherent to the floor, in this case we wanna increase the load.
To do so, elevate for repetitions entire hands (hence ending onto your fingertips) while keeping them perfectly straight and in line with your forearms so to avoid undesired pain and make the exercise effective.
Also in this case you can choose the level of difficulty, if starting in a quadruped stance (beginner/intermediate) or in a push-up one (advanced).
In this second case, it is highly suggested to approach this exercise only when you have developed a very high level of wrists strength.
3 sets x 10 reps (both levels)
 WRISTS BACK HAND
- STRETCH 1 (QUADRUPED STANCE) – BEGINNER/INTERMEDIATE: this exercise wants you to start always from a quadruped stance with the back of your hand facing the floor hence with fingers pointing at you and arms always straight.
Since this stretch is definitely gonna be more intense, make sure to start with one hand at a time, go for both only after getting a little more confident in holding the position with practice.
Maintain the isometric hold helping yourself with the opposite hand that is instead placed on the floor in neutral position so to provide support and hold for at least 5 seconds, if you feel much tension while holding; otherwise go for 10 seconds or more, each wrist.
After getting more confident as said above, place both wrists on floor and hold for the same amount to start with, hence for 10 seconds minimum.
3 sets x 10” hold to start with (aim to reach 30” at least)
- STRETCH 2 (PUSH-UP STANCE) – ADVANCED: for those who have become comfortable with the previous hold, hence with both wrists for at least 20 seconds each, you might wanna challenge yourself a bit more by keeping your body into a push-up stance while performing the stretch.
At the beginning might seem to be quite challenging, but with time and practice will eventually become one of your favorites, why is that?! Because thanks to the development of strength in your wrists with this exercise, you are already building the fundamentals to achieve the back hand wrist push-ups as one of the best wrist strengthening exercises, in my opinion.
3 sets x 20” hold
- PUSH-UPS 1 (QUADRUPED STANCE) – BEGINNER: like said above, this type of push-ups are definitely one of the best.
Also in this case, they can be approached in a lighter way, hence by kneeling on the floor while performing the push-ups on your wrists making sure to drive the elbows always in line with your hips at every repetition
3 sets x 10 reps
- PUSH-UPS 2 (PUSH-UP STANCE) – INTERMEDIATE/ADVANCED: this is the final and hardest variation since you have to have a complete push-up stance while performing the exercise.
3 sets x 10 reps
Only if you have achieved successfully the previous goal for the exercise n.8 that is 3 sets x 20” hold
Pic.-12 Pic.-13
- ELBOW TWISTS (QUADRUPED AND PUSH-UP STANCE): as for the exercise n.3, also in this case you can include a twist of the elbow while holding a kneeling (beginner) or push-up (intermediate-advanced) stance.
Definitely an exercise that shows how much you have improved your wrists flexibility and strength.
QUADRUPED STANCE: 3 sets x 5 reps (each wrist)
PUSH-UP STANCE: 3 sets x 10 reps
- SIDE-TO-SIDE STRETCH (KNEELING STANCE): another direction of stretch that you might think of is the one side to side from a kneeling stance, on the back of your hands.
Here you wanna focus on moving indeed from left to right and back for repetitions while holding both back hands on the floor so to target the sides of the wrists.
It is suggested to perform this exercise from a kneeling stance in order to control better the lateral movement.
3 sets x 10 reps
WRISTS PALM DOWN ROTATED 90° OUT
- FORWARD LEAN STRETCH + HOLD: after completing the “back of the hand” sequence, now you can move on to the hand palms out at 90° angle one.
Starting from a position always in a kneeling stance with arms straight, hands shoulder-width apart and hands with fingers wide opened so to provide better stability, lean back and forth while maintaining the palm of your hands firmly on the floor.
In this case the stretch should be felt more in your forearms rather than in your wrists, but it acts anyway simultaneously on both.
Also in this case, aim to hold the position at every last rep for at least 10 seconds.
3 sets x 5-10 reps + 10” hold every last rep
- ELBOW TWISTS (QUADRUPED AND PUSH-UP STANCE): always from the same position, perform the elbow twists as seen above starting from a kneeling stance if you’re a beginner or from a push-up one if you’re intermediate-advanced.
3 sets x 10 reps
- HANDS’ PALM LIFTS: the execution and the levels of difficulty of this exercise are the same as for the exercise n.5
The only difference is the position of your hands that, in this case, are 90° out oriented compared to the line of your body
3 sets x 10 reps (in both levels)
- FINGERTIPS LIFTS: as for the exercise above, hence starting with palm rotated out of 90°, the execution then is the same as for the one n.6.
3 sets x 10 reps (in both levels)
 SIDE-TO-SIDE STRETCH: this exercise can be performed actually in two different ways depending on the intensity you choose.
With the first one, you wanna make sure to keep the hands shoulder-width apart and from there lean on a side, from left to right for repetitions, while keeping the palms firmly on the floor.
In such way you have also to move one shoulder at a time out of the line of the wrist you are stretching so to make it more effective.
The second form of this exercise instead is performed by placing the hands together, always with fingers out in 90°, this means that both palms are almost touching each other.
Here, since hands are placed together at the center of your sternum line, the stretch will be more intense and with a shorter movement; make always sure to lean side to side gently.
3 sets x 10 reps total (in both variants)
WRISTS BACK HAND ROTATED 90° IN
- STRETCH STANCE (QUADRUPED AND PUSH-UP STANCE): after completing the previous set of exercises with the variant of the hands turned out at 90° on palms, now you can move on to the next one.
This set is performed with the back of the hand again, but this time turned in at 90°; so in this case fingers are facing each other as well as the palm of your hands facing your face.
As for most of the previous exercises, also in this case depending on which stance you choose, it varies the intensity of the stretch.
For beginners and intermediate once again, is suggested to start from a kneeling stance whilst advanced can move on to the push-up one.
3 sets x 30” hold (minimum for beginners/intermediate)
3 sets x 15” hold (minimum for advanced)
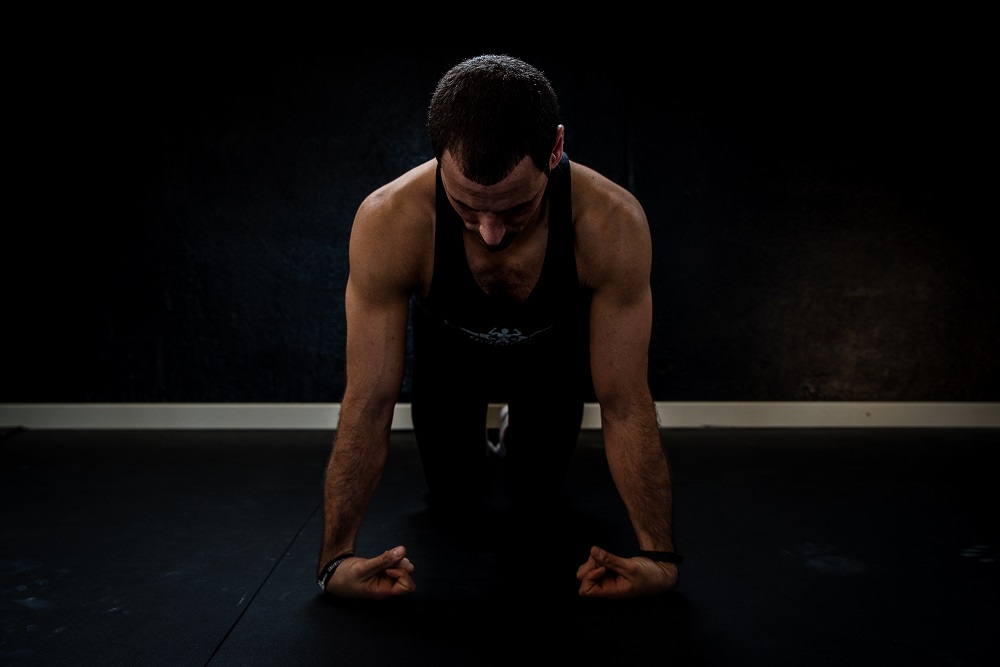
- CLOSING FISTS VARIANT 1: the purpose of this exercise is to strengthen the wrist joint.
It is highly suggested to get familiar with the quadruped stance to start with and only after, when you do feel no more soreness in your wrists, move on to the push-up one.
Start with arms straight in line with your wrists, keep initially the hands wide opened to the inner side and just squeeze your fingers without elevating the back of your hand.
Keep squeezing until you reach the closest point of your fingertips to your hands palm then slowly release them so to open up again the hands.
When you approach the push-up stance, be very careful since the load you put onto your wrists will be increased.
I suggest you closing one hand at a time instead of both together at the very beginning, so to do adapt and condition your tendons
3sets x 10reps (both stances)
- CLOSING FISTS VARIANT 2: in order to perform correctly this variant of the previous exercise, you have to make sure to get a proper stance adequate to your level, do not exceed just for show.
Start in the same stance as above, keep once again the hands wide opened to the inner side and squeeze them until you reach closed fists, then slowly release them so to open up again the hands and get back with the wrists on the floor safely, without stressing them with your bodyweight.
Also in this case, I suggest you closing one hand at a time especially from the push-up stance instead of both together since, to do so, you gotta be very strong in your wrist joint.
3sets x 10reps (both stances)
- ELBOW TWISTS: as for the exercises n.9-11-14, also in this case the execution is the same; the only variation regards of course the position of the hands, hence the wrists, that in this case are with the back turned out at 90°
3sets x 10reps
- PUSH-UPS (QUADRUPED AND PUSH-UP STANCE): as for the exercise n.9, you can also perform push-ups from this position.
The main difference is the fact that, while performing the exercise, the elbows are not driven in line with your hips in the concentric phase, but slightly to the outer side due to the position of your hands/wrists.
Also in this case, consider a progression starting always from a quadruped stance where the load is lighter in order to move on to the push-up one, once you got stronger and more comfortable with it
3sets x 10reps
WRISTS BACK HAND ROTATED 90° OUT
- STRETCH STANCE (QUADRUPED AND PUSH-UP STANCE): the execution of this exercise is the same as for the one n. 18 with the difference that, this time, hands and fingers are rotated to the outside of a 90° angle.
Also in this case is very important to adapt the wrists to the position and so I suggest to perform it firstly from a quadruped stance and only after sometime, from a push-up one
3sets x 30” hold (minimum for beginners/intermediate)
3sets x 15” hold (minimum for advanced)
- CLOSING FISTS: from the isometric stance above, in this case consider adding a second movement that consists in squeezing your fingers as close as possible to the palm of your hands for repetitions.
3sets x 10reps
WRISTS PALM DOWN ROTATED 180° OUT
- BACKWARD LEAN STRETCH + HOLD: Before starting to stretch, make sure to get into the correct position.
In this case, explaining it is more complicated than actually doing it; start from a quadruped stance where your hands are in natural position in line with your shoulders and fingers pointing forward.
From there, rotate your hands to the outside of 180° so that fingers are facing your knees; from here start leaning backwards until the point where your palms are still on the floor, but where you can feel a tension in the joint.
Go all the way forward, release from the stretch and repeat again; at every last rep in each set make sure to perform also a little hold of at least 10”
3 sets x 5-10reps + 10” (minimum)
- CIRCLES CLOCKWISE/COUNTERCLOCKWISE: as for the exercise n.4, also in this case to perform this kind of stretch you have to draw a sort of circle by rotating clockwise and counterclockwise while keeping both palms of your hands rotated out of 180° (as showed in the picture above).
Make sure to perform a slow and controlled movement since, at the very beginning, you might feel much tension while doing it; you have to give time to your wrists to adapt to the kind of stretch provided
3 sets x 10reps total minimum (5 clockwise + 5 counterclockwise)