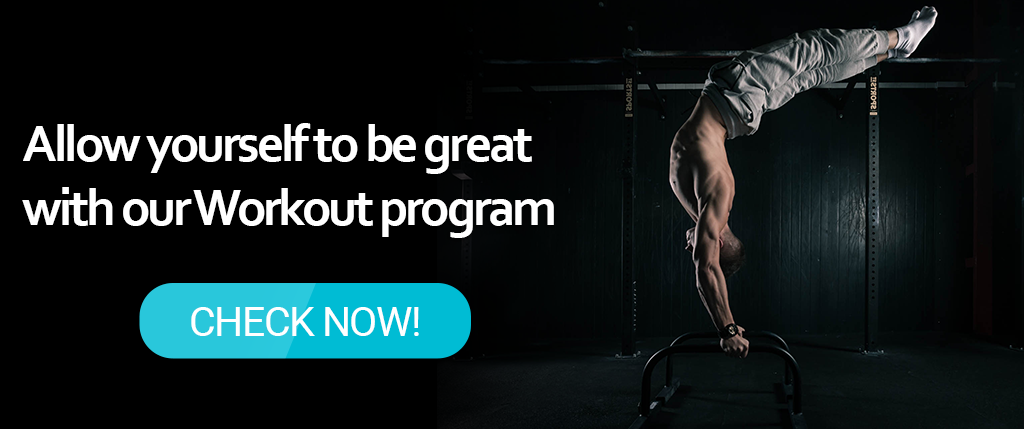
Increased strength and body balance with handstand progressions
![]()
Increased strength and body balance with handstand progressions [TUTORIAL]
The view of a man doing handstand looks pretty impressive. But if you would ask him, he could tell you about a number of benefits in terms of the good mood and overall health instead.
During the handstand, you feel like all body parts are working in a perfect harmony. Your strength, balance and body control are centred in one purpose – to allow your body do an ideal handstand.
Be aware that to feel such feeling takes time, concentration and discipline.
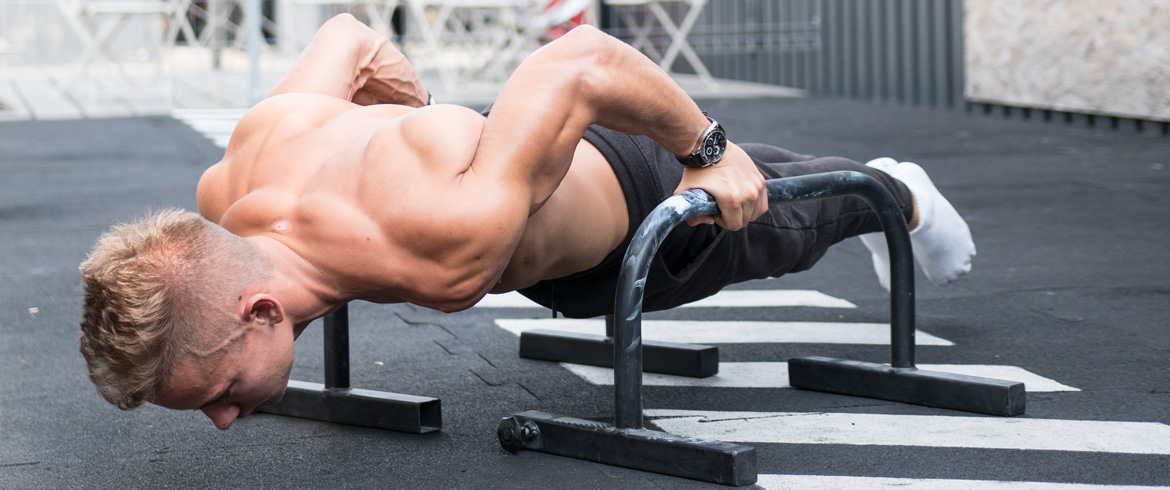
A handstand push-up requires lots of strength and balance expanded during the months and months of training. Still, it gives you a huge amount of skills and benefits, useful even beyond handstand alone.
Most individuals perceive handstand push-up as an achievement perfectly balanced strength of the upper parts of the body. It’s really hard to communicate in simple words, how meaningful changes you will see in your body after dozens of rock-solid handstand push-up reps.
Still, they also forget about also crucial issues like a body balance, control and spatial awareness expanded during the specific motions set, being focused too much on the statically issues instead. The set of skills you can also use in any other workouts.
In the simpler words: preparation and training are as much demanding as results are impressive.
The Tutorial below will show you, how step by step get to an impressive, stable handstand push-up. Try to do not rush and slowly, but consequently work on these progressions. Let’s get the party started.
 TOP progressions for handstand push-up
Start from the basics. To be able to do handstand push-up properly, you need to have overcome regular handstand at the high level. Otherwise, it will be quite difficult to do handstand push-up instead. If you are not familiar with regular push-up, go to our handstand tutorial and catch up in terms the exercise.
Alternatively, you can start from the first progression I have described in this tutorial. The reason is, to make handstand push-up you need to expand your strength in overall and it’s no needed to do freestanding handstand at the moment.
Let’s face it – the handstand push-up exercise is a challenging and simply difficult to perform. In comparison to handstand with wall support, you don’t have any defensive help. A properly done handstand push-up starts from the handstand, then lower the body to headstand and get back to the handstand again with the only support of your hands – no more, no less.
In case of full handstand push-up, the task is even more difficult. You need to get down even further so that the hands are lowered to the point when you drop the hand and take the shoulders down to your hands. Then you press up again.
Doing a full handstand push-up require expanded skills in terms of hand balance which helps you to distinguish from other practitioners.
In the following exercises I have described a lot of progressions, which will take you from the lowest level to the full ability and knowledge, how to make a proper full handstand push-up. The time frame, when you will overcome first exercises may by differ in terms of your current level and skills. Some individuals need simply more time and practise, but some may not. Nevertheless, regular training with using clues included will make your body stronger and better balanced. It’s the matter of time when you’ll perform full handstand push-up.
Despite your skill level and experience, start with the first progression. Surely, you won’t lose time, but prove you are truly ready for the next step, instead. Such verification is always the best practice.
Importantly, be patient and take your time. Such exercise usually does not luck in to perform at once.
Body preparation for handstand push-up
Bear Walk
- a) Put your butt in the air as high as you can.
A-Frame Inverted Press
- a) Hold your elbows pointing backward.
- b) Go down yourself forward as you want to put your shoulders in front of the fingers.
Bent Arm Bear
- a) Burden your upper parts of the body as much as you can.
- b) Hold your elbows pointing backward.
Toes Elevated Inverted Press
- a) During lowering your body, try to hold feet close to the butt.
Wall Elevated Inverted Press
- a) Pay attention to getting down yourself as much as you can.
Knees Elevated Inverted Press
- a) Hold the knees bent and straighten them when you bend the elbows to lower the body.
As I have highlighted before, focus on practicing these progressions first, before trying more difficult exercises. When you will hold each of the poses for 30 seconds at least with proper technique level, you can move on.
Probably, you’ll have any difficulties in performing progressions. When you’ve set the proper skill level, I suggest to do around three to six sets (20 seconds each) of the movements with a short break, around 2 minutes tops between exercises.
Like I always mention in our articles, take your time before moving to the next progression. Spend some time to feel comfy in performing each of the progression and when you’ve done it – you can go to the next step focused of the building of the proper foundations.
Body foundation for handstand push-up
After detailed preparation process of preparing your body for more advanced exercises, the next step is to build appropriate strong and stable foundation for The handstand push-up. The exercises below will help in shortening the way to full handstand push-up.
Jump to Tuck Handstand – Key Bullets
- a) Repeats
Focus on getting down your head slowly, otherwise, you could hurt yourself.
- b) Tucked
Hold the knees bent to jump into a tucked bent arm stand.
- c) Straddled
Lower the head carefully and patiently reduce the angle of your arms.
- d) Straight Legs
Try to hold your elbows close to your sides and remember about breathing!
Handstand Lower to Headstand
- a) Straddled
During keeping your legs in a straddle, try to carefully gett down yourself.
- b) Legs Together
Hold elbows in and remember about keeping full control of the tempo.
Before moving on to the more advanced progressions, make sure you’re able to perform at least 5 movements using all directions written above.
During the workout, try to do at least 5-7 sets of 3 repetitions of the exercise. Make pauses, no longer than 3 minutes. Try to do not make an exercise in a hurry, be patient instead.
Those exercises suppose to help you to build a proper foundation, but if you overcome them, it means you made a huge progress in terms of the upper body strengthening. Of course, do not limit yourself against moving on!
Components practice
With strongly expanded foundation, you can go to the next part which is working on the balance and strength points in the handstand push-up. From the following video, you will learn, how to perform the lowering down and pressing back up – extremely significant components of the handstand push-Up.
Handstand Lower to Bent Arm Stand
- a) Straddled
Try to carefully lower into straddled bent arm stand, from straddle handstand.
- b) Legs Together
Remember about holding the elbows in to your side and do moves without rush.
Bent Arm Stand Press to Handstand
- a) Tucked
First, do the tucked bent arm stand and then press the body up into straight leg handstand.
- b) Straddled
Remember about a straddle bent arm stand first, with a low straddle and press up into straddle handstand.
- c) Straight Legs
Do tucked bent arm stand first and then straighten legs into full bent arm stand. Also, remember about exhaling during the press up into straight leg handstand.
If you want to go to the next progression, make sure you able to perform at least 2 times the movements using all cues above in appropriate technique. Probably during the workout, you will perform components practice and full handstand push-up, so you’ll perform both of them in every training.
Because of the demanding nature of the workout, I suggest to perform them in maximum 5 sets of 2 reps tops of each movement. Doing them slowly and carefully, remember about two or three-minute pauses between the movements.
The Full Handstand Push-Up
Here you go. You’ve reached the final step when you’ll do the full handstand push-up. In the following video, you will see the last handstand push-up progression with more variations.
Headstand Press to Handstand
- a) Straddled
Do first the headstand straddle and remember about exhaling when you press into the handstand.
- b) Legs Together
Try to point toes and keeping elbows in.
Full Handstand Push-Up
- a) Straddled
In the progression, as always, remember about appropriate, patient tempo and exhaling, when you press up. Also, try to touch head to the ground and press down as hard as you can.
- b) Legs Together
Before pushing back up, hold your head as close to the ground as possible.
Before moving on to the next exercise, make sure you are able to do at least 2 or three headstand presses to handstand in the straddle position. Similar to the previous section, try to do the progression from this step simultaneously with the progression from the step below in 4-5 sets with one or two reps of each movement. As always, remember about slow tempo and pauses between the movements 2-3 minutes each.
Congratulation! You have already made a full handstand push-up! During daily exercise keep in mind, that slow tempo and body are you’re the strongest allies. Strength, expanded body balance and discipline in shaping technique and movements play a key role in making handstand push-up an outstanding workout.
Raising standards? Use props!
If you want to make a handstand push-up even more difficult, you can add two props for increasing the range of motions using parallel bars, blocks or cans. Of course, if you have any other equipment helping you to put your head lower over past your hands – use them freely.
Handstand push-up – Advanced versions
- a) Knees on Block
Hold your knees on a block when you get down yourself between the props.
- b) Feet on Block
Straight the legs and come up on toes and get down yourself as much as you can.
- c) One Leg in Air
Firstly, check if you work on both sides and try to lower as much as you can
- d) Full, in Straddle
Begin with a straddle handstand with your hands on two props and lower your body as much as you can. Push yourself back up after.
- e) Full, with Straighten Legs
Remember about keeping your elbows in and breathing. Begin with straight leg handstand with hands on two props and press down as hard as much as possible for you
The best practiced way of training first three progressions is to make at least 3 or 5 sets with 4-6 repetitions each. Make some pauses for 1-2 minutes each, between the movements. You can feel ready to move on when you are able to do seven repetitions in a row without any struggles.
For the rest of the progressions, you can easily go for full press when you are able to do two or three headstand presses to handstand in a straddle position. Treat those as the last step before handstand without props. Make similar training like with first three progressions, but with 1 or 2 reps and longer rests – two or three minutes long.
Handstand push-up training session [TUTORIAL]
Keeping in mind, you have maybe just been taking your first steps in more advanced handstand progressions, below you will find set of a training session with various exercises:
- Warming up – try to warm up your wrists and shoulders for the following workout.
- Freestanding Handstand – do the handstand for at least 10 minutes with breaks as you need.
- Core progressions – now you have to choose appropriate progression, keeping in mind your strength and body balance level. If your level is Tucked Bent Arm Stand Press to Handstand, then make reps according to the instruction included in the progression.
- The Trial of the next progression – if you did core progression without bigger issues, you can go for the next workout, Handstand Lover to headstand for instance. Otherwise, you simply need more time to overcome them.
- Cooling down – after the workout, you need to cool down. You can use one of our shoulders relaxing workout.
- A Regular workout – when you do handstand push-up successfully, you can do other exercises as you like.
There are no shortcuts
Practicing the handstand push-up is extremely demanding exercise, which requires strong will, self-control, and systematicity. You can compare it to the way to the top of the mountain. There are no shortcuts, only long, irregular way.
The best thing is, it’s not required to pose specific kind of knowledge. All you need to do is keep moving forward.
When you want to reach a top of any mountain, you need to wake up early and start walking. The view, with stars on the black sky, is gorgeous, but there is a long way in front of you. If you are in pretty good shape the clue is to keep going and keep going.
If you have the right map (tutorial), the way to the top of the mountain requires only some discipline in making progress step by step.
There are a lot of exercises and workouts which help you in doing handstand pushups or any other physical skill. The foundation of body control and strength is crucial to make a progress.
Here you can create the content that will be used within the module.